
Learn How to
Grow Potent Weed Indoors
Cheap & in Under 3 Months
(Instructional Grow Journal & Progress Pics Included Below)
If you’re a budget grower like many of us (don’t worry, we don’t judge), but you still want really potent bud for medical or recreational use, here is an indoor grow guide that you can follow without breaking the bank too much.
It won’t take too long either, this guide is based on an 84 day (12 week) seed to harvest project that anyone can follow.
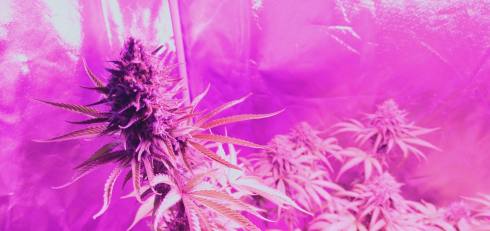
Want Buds Like This?
Table of Contents


Follow our indoor cannabis grow guide and you will have the same exact results. The pictures above we’re taken right at day 84.
Do note, there is a bit of money required for your indoor grow but we’re aiming to keep this cost at a minimum. This is challenging as we still need decent quality products to assure a potent harvest.
We will mention now that we won’t be focusing too much on yield but rather the production of dank, high quality bud – grown affordably from the comfort of your own home.
So what’s first??
Grow Tent ($60 – $130)

To kick things off, you need a decent sized grow tent to house all the magic. There’s plenty of hydro shops that sell affordable and decent sized grow tents in-store or online so just have a look around.
Originally we used a grow tent that was only 60x60x140cm in size but we upgraded to a bigger tent (120x60x150cm) on day 18 of our grow. To save money and potentially get greater yields in the end, just buy a grow tent at the same size as the one we upgraded to – don’t make the same mistake as us and buy a small tent at the start and then upgrade to a bigger one a fortnight later. 😅
Here’s a grow tent exactly the same size as the bigger one we use for $132 from eBay: https://www.ebay.com.au/itm/174327414352
But…
If your new, start small!
You can still get great results using a smaller grow tent. It doesn’t cost that much either. Take this $59 Dick Smith grow tent for example; its only 60x60x140cm (same size as the one we started with) but you can grow up to four plants in it and still harvest a fair bit depending on your techniques. https://www.dicksmith.com.au/da/buy/certa-hydroponic-indoor-grow-tent-60-x-60-x-140cm
Starting in a smaller grow tent is better if your a beginner. It means there will be less work involved with managing your grow as opposed to bigger tents and setups. Smaller tents are easier to control and the setup costs less.
Starting small means things can be simpler. Aim to be as minimal as possible when growing, so spend less and use only what you need. Our guide will talk about that down the line but for the time being, set your eyes on a grow tent that is the same size as ours (120x60x150cm or even the smaller one). Later, we will be talking about an affordable grow light, ventilation, ideal soil, nutrients and lastly, the best way to get indoor specific cannabis seeds that produce potent buds. Don’t worry, we will be including links to all the stuff we’re talking about.
With all our recommendations, we have kept in mind the cost and quality of the products before we suggest them to any one else to use. We look for the best products at the best prices and test them out ourselves to see if they are worthy of being recommended to others.
Even if you grow in a minimal setup like ours, you will still produce some of the dankest buds around because of the well know strains and products we use. Plant genetics, grow tent & pot size, grow medium, nutrients and ventilation all play a vital role in growing good weed indoors.
If you’re a first timer, just follow this guide to get the same results as us. Treat this as a learning curve and remember – you can change things later and you can always scale it up next time.
How many plants can I grow in a 120x60x150cm grow tent?
You could easily fit up to six plants in a grow tent of this size but in our case, we’re only going to grow four. It’s a given that plants won’t yield to their full potential if it’s too overcrowded in the grow tent. This is due to the plants competing with each other for space and lighting; therefore less plants are better in this scenario.
Here’s something worth noting: If you grow sixteen cannabis plants using a 600w HPS light, you will get around 38 grams or just over an ounce each plant. If you grow four plants under this light, you will get 150 grams or 5 ounces per plant. But if you grow just one plant under a 600w HPS light, you will get a monster that’ll yield more than one pound per tree. Note: We’re not using HPS lights in this grow, they cost too much in electricity and output too much heat. Instead we’ll be using a cost efficient LED grow light that perfectly replaces a 400w HPS light.
In time, your plants may outgrow their tent and pots so make sure to initiate the flowering stage at the right time. This means to begin the budding process when the plants are tall enough. As a baseline, before your plants reach half the height of your grow tent, it’s time to flower.
To get your cannabis plants to start flowering, set the plants lighting to 12 hours of light and 12 hours of darkness – known as 12/12. You can get a light timer from Bunnings to do this automatically for you.
Expect to see your cannabis plants to double in size in the flowering phase. If you have a sativa dominant strain, it may triple in size so be weary of your plant during the vegetative stage; maybe only let sativas grow a third of the way up the grow tent before flowering. If it’s an indica dominant strain, it may not grow much taller at all – but rather bush out more. If it’s a ruderalis (Autoflower), it will grow to a set size and automatically produce bud in 90 days from seed without the need to set lights to 12/12.
Pots ($30)

As a general rule of thumb the bigger the pot, the bigger the plant. You can theoretically use any container to grow in as long as it has drainage at the bottom. The more space the roots have to expand, the bigger your cannabis plants will be. If you’re cultivating in either of the grow tents we suggested, smaller pots will be more fitting.
We went to Bunnings and purchased four square pots (25x25x26cm) which fit well in either of the grow tents. Like we said, the bigger the pot, the bigger the plant but in a small indoor grow, its best to use smaller pots. The pots we used were at the perfect size to fit four in the smaller grow tent – so it’s without a doubt they’ll fit in the bigger one. We paid a total of $32 for all four square pots from Bunnings.
Seeds ($80 – $110)

To save us much coin as possible, try to get some seeds from a mate or someone you know who has a potent indoor strain that you like. If you can’t get a good indoor strain from someone, check out ILGM seed bank online to get the best indoor marijuana strains delivered in stealth.
Having a good cannabis strain from the start massively impacts the quality of the end product. Strain hunters like Green House Seeds know this and travel all around the globe to find marijuana strains of the highest quality to distribute via their seed bank.
Cannabis seeds from the internet can cost upwards of $80 – $110 USD per 10 pack so if you buy them, be sure to get your money’s worth. After all, some of these strains are Cannabis Cup Winners (if you don’t know, this is the biggest cannabis strain competition in the world!! 😱) so don’t waste em!
Why buy cannabis seeds online?
There are a number of reasons people purchase marijuana seeds online. Number 1 is variety, 2 is reliability and 3 is reputation.
In terms of variety, there are hundreds of strains available online from varying seed banks that cater to medical, commercial and recreational growers. There are strains with high CBD, low CBD, high THC, low THC etc. For our grow, we browsed through ILGM’s 40+ strain range and chose an easy to grow Cannabis Cup Winner “White Widow” and a fast growing yet affordable “Strawberry Kush“.
With the reliability of a seed bank, this can be checked by others experiences and by you personally. It pays well to see what others are saying about the strain and seed bank your interested in before buying. Popular cannabis forums like Rollitup have a lively community of growers that post information about seed banks daily. Have a look there or check our cannabis growing forum for seed bank reviews.
When buying cannabis seeds online, you can determine the seed banks reputation by quickly doing a Google search. Type in “example seed bank review”. You can flick through various websites to read the seed banks reviews and gauge the reputation before purchasing. The age of a seed bank and its social media presence are further clues on reputation. If a seed bank has been around for awhile that’s a good sign they are in good business. If a seed bank has a strong presence on social media – with lots of likes, shares and positive comments etc, it’s another tell tale sign they are reputable.
Some people skip all this and just buy straight up from a seed bank online, wait, receive the seeds, grow them and review it themselves. How quick are deliveries, what’s the germination rate of seeds, does the strain grow as described etc are just a few things to keep in mind if your doing this.
Soil Mix ($85)

For this cost effective cannabis indoor grow, we suggest purchasing and utilising two soil types. One of them is Bio Diesel Max Coco Coir with Perlite 70/30 mix ($41) and the other is Canna Terra Professional ($33) available online or from most hydroponic stores.
Combine both these soil types to create a well aerated soil mix that has optimal nutrients for early and late stage cannabis growth.
We added an extra 5 litres of perlite to the mix to further improve drainage and aeration. A 5ltr bag of perlite will run you about $9 from places such as Bunnings online.
To mix the soil, get a large container or tarp and pour out half a bag of Bio Diesel (25ltr), half a bag of Canna Terra (25ltr) and the additional perlite (5ltr) in the container or tarp. Mix all this up thoroughly with a small shovel or your hands if need be. Break up any clumps you come across in the mixture and try to get your soil consistency to look like the image above.
When your soil is mixed up, you can begin adding them to your pots. Here’s a handy tip, after you fill up your pots, place clean large McDonald’s cups in the centre of the pots and also fill with soil. Make sure the top of the cups is above soil. These Macca’s cups will be used as the first potting container for your seeds when they have germinated later on.
Smaller containers like the Maccas cups allows soil to dry up faster which lessens the chances of root rot. If you like, you could just plant your cannabis seeds straight in to the bigger square pots but don’t over water it.
When your plants are big enough in the Maccas cups, simply remove the cups from the pots (leaves a hole), turn the cups upside down then lightly squeeze & ease the plants and soil out. You can also cut the cups with scissors vertically. You then place the plants and soil back into the hole in the centre of the pots minus the Maccas cups. Try not to compact the soil too tightly when transplanting and add water when finished. If you placed a Maccas cup in the centre of your pot, then removed the cup when its time to transplant, it leaves a hole to put the plant and soil back in.
Why Coco Coir?

Coco Coir is not only an ideal grow medium for indoor cannabis plants, but it improves overall soil aeration & is great for water and nutrient retention. It’s worth noting that Coco Coir can absorb up to 10x its weight in water so your plants won’t get easily dehydrated.
Why Canna Terra Professional?
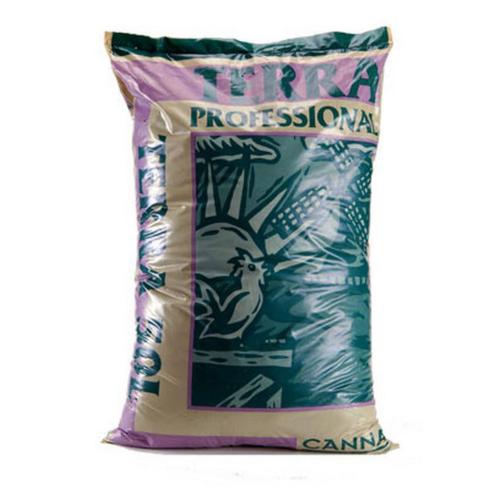
If you want an all round pre-fertilised soil and a more than amazing growing medium for your first time growing indoors, invest in Canna Terra Professional. This soil was created with the ‘new grower’ in mind. Combine Canna Terra Professional with Coco Coir and boom, you have a growers dream soil mix. Canna Terra is enriched with nutrients + its soil consistency is great for cannabis growth and Coco Coir has the perfect aeration for root expansion – WHICH all in all creates a perfect environment for cannabis to thrive in.
Why perlite?

Perlite is great in improving soil aeration and drainage. Pair this with Coco Coir and you will have a more than excellent aerated grow medium. Essentially, perlite loosens the soil and allows roots to expand more easily. The easier the roots can expand, the more water and nutrients can be absorbed.
Lighting ($160)

For a decent priced grow light that covers both the vegetative and flowering (bloom) stage of cannabis, we recommend VIPARSPECTRA 1000W LED Grow Light Full Spectrum Indoor Veg Flower Plants Lamp ($160). This LED grow light comes with an easy to read booklet that explains how to use the lights for the vegetative and flowering phase.
Nutrients ($95)
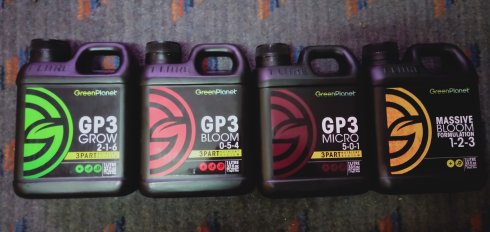
For our wallet friendly nutrient suggestions, we recommend Green Planets GP3 nutrient set ($69) and follow their feeding chart available from here. The GP3 nutrient set covers the vegetative and flowering stage of cannabis. For increased potency and yield, add Massive Bloom ($27) which is also apart of the Green Planet range of nutrients. For Massive Bloom directions of use, you can refer to the feeding chart linked above as well. Optionally; to increase your plants nutrient and water uptake later on, add Mycorrhizal fungi to your soil mix. Mycorrhizal can cost you from $5 – $200 a bag depending on the amount needed.
What’s Mycorrhizal? Mycorrhizal is a beneficial fungi that forms a symbiotic relationship with plants. Plants create organic molecules like sugar via photosynthesis and this can be utilised by mycorrhizal fungi to better supply water and nutrients like phosphorus to the plant via the roots.
Ventilation ($25)

Ideally, if you want the best results, you would look at installing a ventilation system like mentioned here, but this can be costly.If you want a budget friendly alternative, you could put two mini fans in your grow tent (do note, this isn’t as effective). Point one fan towards your cannabis plants and the other to suck air out of your tent.Mini USB fans will cost you around $25 for two of them. Kogan sells the type of mini USB fans we use, you can check them out here.
If you want more powerful fans that have two speeds and rotates at 180 degrees to give your plants a wider flow of air, buy a oscillating grip clip fan. They cost $35 but they do a great job at cooling your cannabis plants. They simply clip onto the poles of your grow tent.

How much will all this cost?
We have used the most budget friendly products to make this indoor grow journey as affordable as possible. At the most, your looking at around $650 – $700 to get a fairly decent indoor grow set up that will last you from start to finish. If you think about it, that’s about the same price as the new PS5.
You might already have your own soil mix, pots, nutrients, seeds etc lying around so you may not need to spend this much. But, if you want similar results as us, you have to follow our guide.
Here is a bullet point list on what you may need and the rough amount you might need to pay;
- Grow Tent $60 – $130
- Pots $30
- Seeds $80 – $110
- Soil Mix $85 (Coco Coir, Canna Terra & Perlite)
- Lighting $160
- Nutrients $95 (GP3 set + Massive Bloom)
- Ventilation $25
- Optional: Mycorrhizal from $5
All this could seem like a fair amount, but if you want high quality indoor buds, you need to spend the money. Plus the initial investment will pay off after a successful harvest. You can also reuse the equipment, nutrients, pots etc for more grows in the future.
Journal
Day 1, we placed the White Widow & Strawberry Kush seeds in wet paper towel and put them in an airtight plastic container. We then set the container in a dark setting e.g. drawers or cupboards. In our case, we used drawers. It doesn’t matter where you place the wet paper towel with the seeds, just as long as it’s in an airtight container and in a dark spot.
Day 4, seeds have sprouted the white tap root. Time to place them in soil. When planting, place seeds in the soil with the taproot pointing down. Aim to plant about an inch or two deep. Spray the soil with a bit of water after.
Day 7, the plants have emerged. Four leaves are present – the first set are the Cotyledon leaves, the second set is the first true cannabis leaves. It’s a little late but we added a light sprinkle of mycorrhizal fungi around the stem of the plant to improve nutrient and water uptake later on. We should have added it in the soil when we first planted the seeds but oh well, it’s better late than never. We also sprayed the plants lightly with water.

Day 10, lightly watered each plant. Two more leaves have developed.

Day 13, light/moderate amount of water added. These indoor cannabis plants are starting to take off. There are now a total of 10 leaves formed on each plant.

Day 16, fed the plants with GP3 Micro, Grow and Flower nutrients all mixed in one spray bottle.
We used 0.1ml of Grow, 0.1ml of Flower & 0.5ml of the Micro GP3 nutrients combined in a 500 ml spray bottle and shaken well. Use only half the bottle to spray the foliage and soak the soil.
Some people use different spray bottles for each different nutrient but that’s totally up to you. We haven’t seen any adverse effects from mixing all the nutrients in the one spray bottle thus far.

Day 18, we’ve removed the Maccas cups and transplanted to the same spot where the Maccas cups were. Moderately watered and added the rest of the GP3 solution mix from the spray bottle. We also upgraded our grow tent to a 120x60x150cm.

Day 21, the strawberry kush strain (the two plants to the left) seems to be growing quite well. The white widows are. The top right white widow is especially slow in growth while the other one is drooping it’s leaves. This can be stress from the transplant, the addition of nutrients or too much water. However the strawberry kush strains have received the same treatment and aren’t showing the same symptoms. It could even boil down to plant genetics. Some cannabis strains are better suited for indoor environments.

Day 23, the strawberry kush is continuing to grow well. The white widows are slightly behind.

Day 26, we fed the plants nutrients, fimmed the new growth on the main stem, and added a trellis we were given for free to the strawberry Kush at the top. The nutrients were GP3 Grow – 3.1ml, GP3 Bloom – 0.6ml, GP3 Micro – 2.5ml x 5ltr of water.

Day 29, sprayed the plants and fimmed to create more shoots later.

Day 32, soaked the plants with 5 litres of water equally distributed.

Day 35, added GP3 Grow – 3.1ml, GP3 Bloom – 0.6ml, GP3 Micro – 2.5ml with 5ltr of water.

Day 39, switched the lights to 12/12.

Day 44, added GP3 Grow – 3.8ml, GP3 Bloom – 3.8ml, GP3 Micro – 3.8ml with 5ltr water.

Day 48, heightened the lights to allow for more vertical growth. Sprayed the leaves and lightly soaked the soil with 2 litres of water.

Day 55, added GP3 Grow – 1.3ml, GP3 Bloom – 7.5ml, GP3 Micro – 5ml and GP3 Massive Bloom – 25ml with 5ltr of water to the plants.


Day 59, soaked the plants with 5 litres of water.
Day 63, added GP3 Bloom – 10ml, GP3 Micro – 5ml, GP3 Massive Bloom – 25ml with 5 litres of water to the plant.


Day 72, added GP3 Bloom 10ml, GP3 Micro 5ml, GP3 Massive 25ml mixed in 5ltrs of water and apply it to your plants.


Day 79, moderately soaked the soil with water.


Day 84, finally chopped down the trees. It was a sad time.


Final Thoughts
Thats our article on How to Grow Weed Indoors in 2021. It took us just under 3 months to harvest 4 ounces of dried bud.
Next time, we will be growing weed inside with a carbon filter to mask the smell of cannabis, especially with the two potent strains we grew with. We will also use a pH and EC meter so cannabis can uptake nutrients better meaning faster growth and bigger buds.
Link: How to grow cannabis outdoors
![]()